

 701
701
How to upload a document
Looking to Web Upload your documents? Click here: How To: Web Upload Documents
Many screens have fields that must be completed before a document can be created.
Here's a summary of the screens and the fields that need to be completed before you can create a document:
-
Vendor - Must have Name Assigned
-
Requisition - Must have Vendor and Requisition Number or Internal Requisition Number Assigned
-
Purchase Order - Must have Vendor and Purchase Order Number or Internal Purchase Order Number Assigned
-
Invoice - Must have Vendor and Invoice ID or Invoice Number Assigned
-
Master Contract - Must have Vendor and Master Contract ID or Internal Master Contract ID Assigned
-
ISA - Must have Master Contract and ID Assigned
-
SGSA - Must have Master Contract and ID Assigned
-
SELPA - Must have Name Assigned
1. On the Documents tab, select the New button

2. Click on the '...' on the Attachment field to select the file to be uploaded.
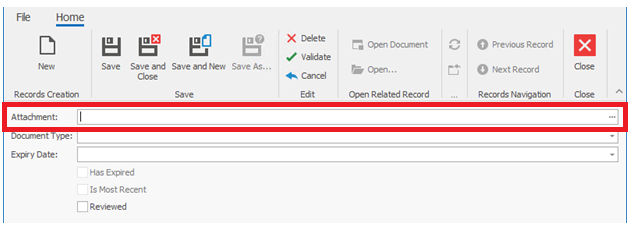
3. After choosing the file to be uploaded, use the drop downs to select the Document Type and Expiry Date (if necessary)

Please note that an Expiry Date may be required, depending on the Document Type selected.
4. The "Is Most Recent" field will automatically populate depending on the document type and expiry date.
5. To complete the document upload, select on of the following:
- Save - to upload and continue to edit the document record.
- Save and Close - to upload and exit the document record.
- Save and New - to upload and open a new document record.


